Using your self-hosted Authentik as an Identity Provider for Tailscale
Tailscale is a very well-known VPN service, which uses Wireguard under hood but abstracts most of the complexity away, and uses very clever tricks to punch through pretty much any firewall both ways, establishing a reliable mesh amongst your devices. Another cool thing about Tailscale is that they try to keep as little information about their users as possible, and so do not have their own login mechanism, instead leaving this task to common authentication providers like Google and Microsoft, or allowing the use of any identity provider compatible with OpenID Connect, which is the case for Authentik, and the topic of this post.
I decided to properly document this after someone saw my post on Twitter mentioning this integration, and reached out asking for help with replicating my results.
Requirements
First of all, you will need:
- A domain you own and have control over. I will use
example.netfor this guide. - A custom email address under that domain. You do not need to host your own email server for that, you can use something like Cloudflare Email Routing or ForwardEmail.net to redirect your custom address to your usual inbox at your preferred email provider. I will use
[email protected]. - An Authentik instance that is publicly accessible and has a valid TLS certificate. The address of the Authentik instance does not need to be on or under the same domain used for the email. I'll use
https://auth.example.net. - A reverse proxy capable of serving specific paths. I'll use NGINX Proxy Manager in this guide, but Traefik or even Cloudflare Tunnels* should work just fine.
- Any machine with Python installed that can be reached by the reverse proxy.
* According to multiple comments below, in order to serve this via Cloudflare, you need to disable anti-bot protections or Tailscale won't be able to reach it.
WebFinger setup
In order for Tailscale to discover your Identity Provider (Authentik in our case), it reads the domain of your email address and makes a request against its WebFinger endpoint (https://<EMAIL_DOMAIN>/.well-known/webfinger) to look for the information it needs.
https://github.com/sudo-kraken/authentik-webfinger-proxy
Unfortunately, Authentik does not provide any WebFinger information out-of-the-box, and so we have to "bodge" a solution to have this info available. Thankfully, someone already did the hard part for us!
The first step is to copy the script in the link above to the machine where it will be executed. Then, open the script in a text editor and edit line 17, replacing idp.example.com with your Authentik instance address (auth.example.net in our case). Next, save and execute the script. If all goes well, you should see the message "Starting WebFinger server on port 8000". Now, to make this available to the rest of the world, we need to wire it through our reverse proxy.
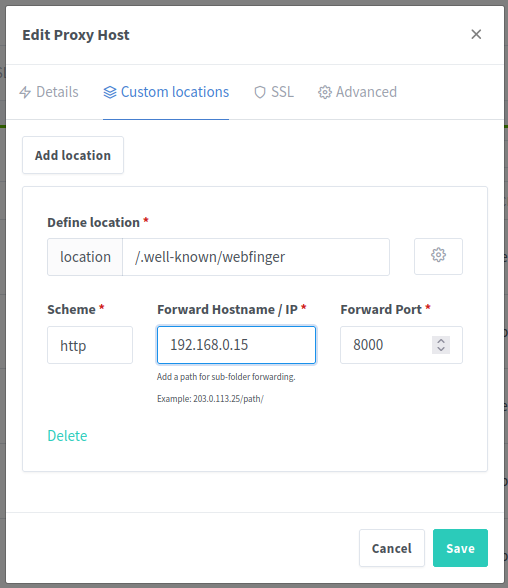
In NGINX Proxy Manager, edit the proxy host item for your email domain (or create a dummy one if it does not already exist) then go to the tab "Custom locations". Add a new location /.well-known/webfinger with scheme HTTP, the IP of the machine where the WebFinger container is running, and port 8000.
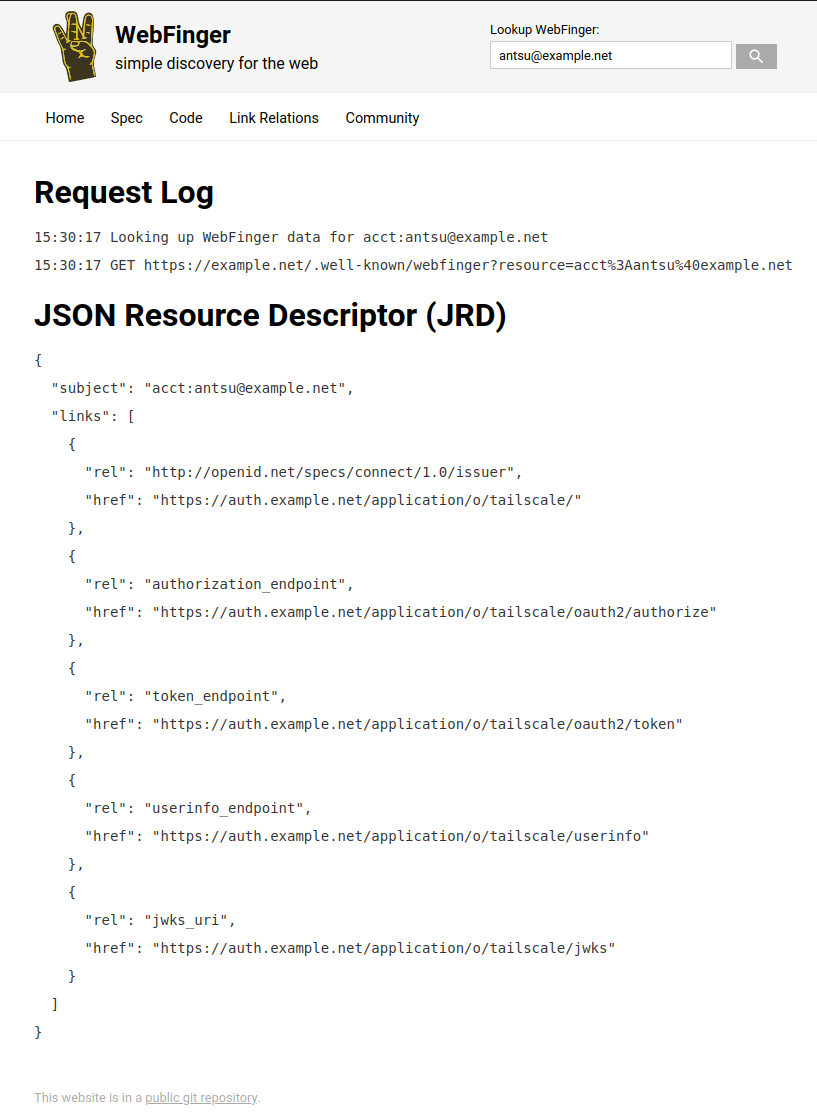
If all went well up to this point, you should be able to verify your WebFinger setup by visiting https://webfinger.net/lookup/ and entering your email address in the lookup field. The result should be similar to this. Note the href fields all point to our Authentik instance:
Authentik Setup
In Authentik, the setup process is basically the same as for any other OIDC app.
Certificate
First, we need to create a certificate to sign our responses to Tailscale. Go to System > Certificates and then Generate. In the Common Name field, enter just "Tailscale" (without quotes) and set the validity to your desired period (I used 10 years, you do you), then click Generate.
Provider
Next, go to Applications > Providers and create a new provider. Select OAuth2/OpenID Provider as the type and click Next. Fill in the following fields:
Name: Whatever you wantAuthorization flow: default-provider-authorization-implicit-consentClient type: ConfidentialRedirect URIs/Origins: https://login.tailscale.com/a/oauth_responseSigning Key: Tailscale- Leave everything else as is.
- Copy the
Client IDandClient Secretto somewhere safe, we will need these values soon.
Application
Lastly, head to Applications > Applications and click Create.
Name: TailscaleSlug: tailscaleProvider: the provider you created in the previous steps.
tailscale (all lower case) so it matches the information in the WebFinger script.Optionally, give it an icon, a group, and create a group binding to make it easier to assign the app to your users.
Tailscale setup
The final step is to go into Tailscale and select Sign up with OIDC, enter you custom email, and wait for Tailscale to probe your WebFinger endpoint. You will be then asked to enter the OIDC ID and Secret generated by the Authentik provider, which you copied previously. Then you confirm, log in with Authentik and it's off to the races!
After this is complete the WebFinger stuff is no longer needed and can be stopped/disabled.
